|
|
Playing the Game 234mg
The white of the plaster on the walls and the white of the feathers on the herons that live in the area are in perfect harmony at Himeji Castle.
A game of The White Castle is divided into 3 rounds of play, during which each player takes 3 turns.
The player who is at the top of the Turn Order track is the first to take their turn. Once that player has concluded their turn, it is the next player shown on the track. Once all the players have played 3 turns (that is, once they have played 3 dice each and there are a total of 3 dice left on the Bridges), then that round comes to a close (see End of the Round) and the next round begins. At the end of the third round, it es on to the End of the Game.
CLANS POINTS AND CONDITIONS FOR VICTORY 332hu 
When red-colored fans are collected, move the Fan token up the corresponding number of spaces.
The golden fans are only counted at the end of the game.
A Player’s Turn 3o115f
During your turn, you will choose 1 die from one of the Bridges and place it in one of the areas marked with a die symbol, and then apply the effect of that space.
USING THE DICE 4r5u49
From atop the bridges of the palace, one can contemplate the koi fish swimming below. Many take this moment of calm as they over these bridges to decide which is the right path for them to take.
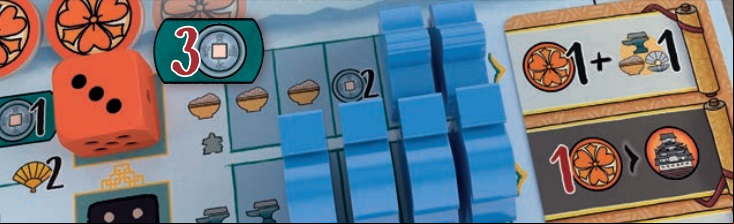
- Choose a die from either of the 2 ends of whichever Bridge you prefer. The dice between the ends along the Bridge are not available. If there are still dice on the central part of the bridge after the die is taken, the die closest to the newly vacant spot is moved onto it without changing its value so it is available for the next player.
- Put the die in one of the spaces on the main board or your Domain board that shows a die icon. When placed, it will always cover another value: either the one printed on the board or that of another die that is already in that space.
- If the value of the newly placed die is greater, gain the difference in coins from the common reserve.
- If the value of the newly placed die is less, pay the difference in coins to the common reserve.
- If the value of the newly placed die is the same as that below it, no coins are gained or paid.
When the coral die showing 5 is placed on top of the 3, you get 2 coins. Later, someone places a 1 on top of that 5, which means they must pay 4 coins.
STACKING DICE 1v4k4b
Only a single die can be stacked atop each die, and only on the spaces of the main board.

In a 2-player game, dice cannot be stacked on top of other dice in any part of the game.
- If you choose the die on the left side of the Bridge, you gain the Lantern Reward from your own personal domain.
- The action or actions for the space you placed the die in are now carried out in whatever order you choose.
GAINING AND PAYING COINS AND DAIMYO SEALS 402sk
When a black number appears together with an icon, you gain a quantity of coins, Daimyo Seals, Clan Points, Resources, etc. equal to that number.
A red-colored number together with the coin icon or Daimyo Seal icon indicates that you must pay the indicated amount in order to gain or perform what is indicated by the arrow.
 Gain 2 Daimyo Seals
 Pay 3 coins to perform the Courtier action
Any money changing hands is always indicated in the game with coins of a value of 1. The players can make change with the common reserve using the larger 5-value coins at any time.
GAINING AND PAYING RESOURCES 4b3n3c
Your Domain board has a track for each of the 3 Resources, showing values from 0 to 7. If you gain a Resource, move the cube up on the corresponding track. When you spend those Resources, move the cube down. You can never have more than 7 of any Resource (any extra are lost), and you can never spend Resources below 0.
The Grounds Areas 52q3l
The Castle 2-players 7524g
The first floor of the castle is known as the “thousand-mat room” because of the enormous quantity of tatamis that are placed on the floor for the comfort of visitors.
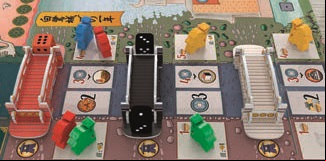
Dice can be placed in the Castle within any of the 5 rooms: 3 spaces are available on the Stewards’ floor and 2 spaces are available on the Diplomats’ floor.
The action or actions for these locations are determined by the color of the die that is placed there: You can carry out the actions shown on the card next to the Die tile(s) matching the die that was just placed.
On the Stewards’ floor, up to 2 actions can be performed in any order on the same card if the die color used appears in that room twice. If there are no actions available for one of the die colors, dice of that color cannot be placed in that room.

If you play this white die here, you get 2 coins because the die was placed on top of a 3 and shows the value 5. In this room, the actions on the card matching the white die can be carried out in any order: By paying 1 Daimyo Seal, you can perform the Courtier action, and furthermore, you can move your Iron marker up 2 spaces.
outside the walls 2-players 6i2u3v
The clans who come to Himeji Castle are usually made to wait at the bottom of the hill until they are granted entrance into the domains of the Daimyo.
These 2 spaces are not restricted by color, so any color of die can be placed in them.
When you place a die Outside the Walls, you are able to perform 1 of the 2 actions indicated by the space it is placed in. The game’s 3 principal actions are available here:

It would not be possible to place another die in the space on the left because it would exceed the maximum of 2 dice placed in a single space. So, you play a black die in the space to the right and pay 1 coin (it was placed on top of a 5). Then you choose to perform the Warrior action.
The Well 2de5s
The Well of Okiku is one of the most enigmatic locations of Himeji Castle, and it hides unexpected surprises within it.
The value of this space is always 1, regardless of other dice that were placed here earlier. There is no limit to the number of dice that can be placed in this space. If a die showing a value greater than 1 is placed here, in addition to the Resources granted by this location, you will also receive the corresponding coins.
When a die is placed, 1 Daimyo Seal is gained along with the benefits indicated on the 2 tiles there.

By placing a black die showing a 3 in the Well, you gain 2 coins, 1 Daimyo Seal, 1 Mother of-Pearl, and 1 Resource of your choice. The coral die that was previously placed there has no effect at all.
The Personal Domains 2a706n
Each clan has a council of wise men who decide what the next step is to take in order to ensure the maximum influence in the Heron’s court.
Each die color is assigned to a space on your Domain board and corresponds to a line of Clan as well as certain actions and their associated rewards.
- If a coral die is taken, it can only be placed in the Courtier’s line,
- a black die with the Gardeners, and
- a white die with the Warriors.
When these dice are placed, the following steps must be followed in the order they appear:
- Gain visible rewards: You gain the rewards (Resources, Daimyo Seals, coins, and/or Lantern Rewards) indicated by the icons visible in the line where the die was placed; then
- Gain the Action card reward: You can perform the action shown on the card that corresponds to the line where the die was placed.
When this die is placed on your board, you will have to pay 3 coins, as it was placed on the printed 6. You will gain 3 Food and 2 coins, and after that you may perform the card action. In this case, the action is to obtain 1 Daimyo Seal and 1 Resource of your choice.
Sending Clan to the Court of Himeji 435732
During the game, you will send of your Clan to work in the gardens, to train in the defense of the castle, or to climb the social ladder of the nobility. At the end of the game, these Clan will grant Clan Points in different ways (see "End of the Game").
Warrior 2y4911
This action allows you to take the Warrior piece farthest to the left in your personal domain and assign it to any Training Yard. Each Training Yard can house any number of Warriors from all the Clans.
Placing a Warrior has a cost in Iron that depends on which Training Yard you place them in. When a Warrior is placed in a space, you can carry out the action or actions indicated on that space’s Yard tile(s) in any order you choose.
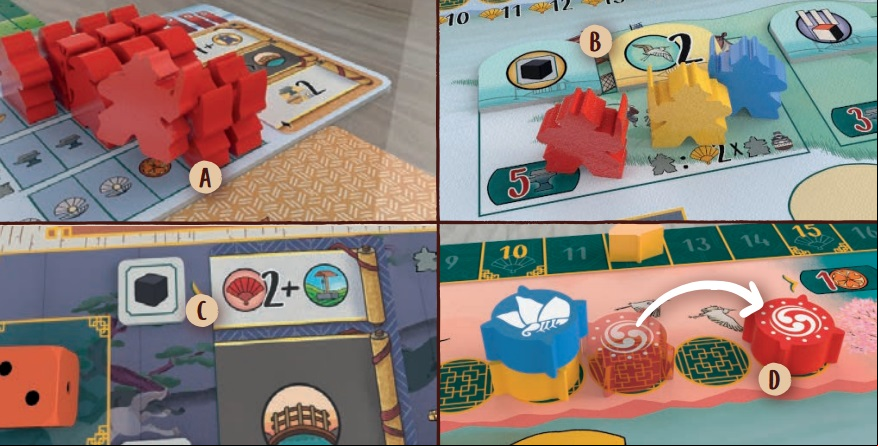
The red player carries out the Warrior action, so they take the first available Warrior from their personal domain A. They must pay 5 Iron to place it B, and then can carry out any action that is assigned to a black Die tile, so they choose this action Cto obtain 2 Clan Points and the benefit of the Well. In addition, they move their Influence marker forward 2 spaces D.
GARDENER 2q4z63
This action allows you to take the Gardener piece farthest to the left in your personal domain and assign it to a Garden card that does not already have a Gardener from your Clan.
Placing Gardeners has a cost in Food that depends on the Garden card. When your Gardener is placed on a card, you carry out the indicated action.
The yellow player performs the Gardener action: They take the first available Gardener from the row on their Domain board (in this case, it is the second one that the player places). After paying the 4 Food it costs to place it, the player pays 3 coins to perform the Courtier action (with its own usual cost). It was not possible to place the Gardener on the card that grants 2 Daimyo Seals since there was already a Gardener from their Clan on it.
COURTIER 6o1x6q
Courtiers allow you to carry out up to 2 of these different actions: either just one of them, or both once each, even using different Courtier pieces:
 Request an audience: Take the Courtier piece that is farthest to the left on your Domain board and place it in the Gates of the Castle space by paying 2 coins. The Gates of the Castle can hold any number of Courtiers from all the Clans. Request an audience: Take the Courtier piece that is farthest to the left on your Domain board and place it in the Gates of the Castle space by paying 2 coins. The Gates of the Castle can hold any number of Courtiers from all the Clans.
AND / OR
 Social Climbing: Take 1 of your Courtiers that is in the Castle and pay 2 or 5 Mother-of-Pearl to move up 1 or 2 levels in the Castle. The Courtiers at the Gate can access any of the first-floor rooms. The Courtiers that are on the first floor can move to any room on the second floor. Courtiers can get to the Daimyo’s room from any room on the second floor. Social Climbing: Take 1 of your Courtiers that is in the Castle and pay 2 or 5 Mother-of-Pearl to move up 1 or 2 levels in the Castle. The Courtiers at the Gate can access any of the first-floor rooms. The Courtiers that are on the first floor can move to any room on the second floor. Courtiers can get to the Daimyo’s room from any room on the second floor. This movement cannot be divvied up among different Courtiers and must be done all at one time.
- If the Courtier ends their movement on the first or second floor of the Castle, you must carry out the following steps in the order they appear:
- If the Courtier’s move ends on the third floor of the Castle, in the Daimyo’s room, you must carry out these steps in the following order:
- Gain the Lantern Reward

- Place the Courtier in any available position on the Daimyo’s favor card if there are any available, and gain the indicated benefit. If there are no available spaces left, simply leave the Courtier in that room and do nothing more.

The blue player performs the Courtier action, taking the first available Courtier from their personal domain Aand paying 2 coins to move it to the Gate, where they already have 1 Courtier B. After that, they pay 2 Mother-of-Pearl to move 1 of their Courtiers. They opt for the one that is already on the first floor of the Castle C and move it up to a room on the second floor D. Once this is done, they move the card from their Domain board to their Lantern Area and turn it face down E. Then they take the card that is in the room they just moved the Courtier to and place it on their Domain board before executing the light background action: in this case, the action is to obtain 3 Resources of their choice F.

T he green player carries out the Courtier action but, this time, chooses not to pay the 2 coins to place their Courtier at the Gate. Instead, they opt to pay 5 Mother of-Pearl to move a Courtier they have on the first floor all the way up to the third floor. Once the Courtier arrives, they obtain the Lantern Reward and 1 of the rewards available on the Daimyo card, choosing the 2 Daimyo Seals.
Daimyo Seals 5p4t40
The Regent having a good opinion of you is essential for achieving your goals at court.
Daimyo Seals represent vouchers from the clan of the Regent, which you can accumulate during the game. Up to 5 of them can be stored in your personal domain. They can be used to move into the next season of the age of Time track as well as to perform certain actions on the cards of the first floor.
Additionally, at any moment during the game, you can exchange 2 Daimyo Seals for 1 Resource of your choice (Food, Iron, or Mother-of-Pearl) or exchange 1 Daimyo Seal for 1 coin. You may do this as many times as you wish. A reminder of this rule is shown on your Domain board with these icons:
Lantern Rewards 6h6s70
The entire castle is illuminated with light from the lanterns, their glow guides the steps of those who visit.
Every time you activate a Lantern icon, you receive the benefits of all the icons that are visible in the Lantern Area of your personal Domain, in the order you choose. If you wish to get more cards to add to your Lantern Area, you can do so through social climbing in the Castle on the 1st and 2nd floors.
Every time this player gets a Lantern Reward, they gain 2 Clan Points right away, 1 Food, 1 coin, and move 1 space forward on the age of Time track. If more cards are added later, the reward becomes more significant.
The age of Time track 4x1x31
Herons are the symbol of Himeji castle, and their behavior over the course of the year marks the arrival of the most important events at court.
This track symbolizes the Influence that each Clan has at court, and at the end of each round of the game is used to determine the order of the players’ turns in the following round.
When your Clan gains Influence, move your Influence marker forward on the track. If you land on a space occupied by another player’s token, place your token on top of the stack.
There are 3 Checkpoints along the age of Time track that divide the year into the 4 seasons. In order to move past each Checkpoint, you must pay the cost of 1, 2, or 3 Daimyo Seals as shown. If you do not want to or are unable to pay the cost, you cannot move your Influence marker into the next season.
Also, you will get points at the end of the game depending on the position you have obtained on this track.
END OF THE ROUND 513y3d
When there are only 3 dice in total left on all of the Bridges, the end of the round is activated.
- New order of turns:
Whoever ‘s Influence marker is the farthest along the age of Time track will have the first turn in the next round. If there are ties, the player whose token is on top goes first. Arrange the Heron tokens accordingly.
When you finish the third round of the game, after updating the turn order, go directly to the End of the Game section without applying the following steps.
- Gardens:
 At the end of each round, there will always be some dice on some of the Bridges. When the round is over, Gardeners are activated if the Bridge above them has at least 1 die on it. The actions on the Garden cards beside the Bridges that still have dice on them are now applied in turn order: The players use each of the actions where they have Gardeners just once each, but in whatever order they prefer. At the end of each round, there will always be some dice on some of the Bridges. When the round is over, Gardeners are activated if the Bridge above them has at least 1 die on it. The actions on the Garden cards beside the Bridges that still have dice on them are now applied in turn order: The players use each of the actions where they have Gardeners just once each, but in whatever order they prefer.
At the end of each round, there will always be some dice on some of the Bridges. When the round is over, Gardeners are activated if the Bridge above them has at least 1 die on it. The actions on the Garden cards beside the Bridges that still have dice on them are now applied in turn order: The players use each of the actions where they have Gardeners just once each, but in whatever order they prefer.
- Prepare the following round:: At the end of the first and the second round,
- Take all the dice of each color, roll them, and then place them on the Bridges again in ascending order from left to right as you did during the game setup.
- Move the Round marker forward 1 space.
END OF THE GAME 5ky37
When the year comes to a close, the clans come together in the winter court and bow in respect to the clan that is the best among them.
At the end of the third round, after establishing the new order of turns, the final points are counted up. In addition to the points collected during the game, players also get Clan Points by carrying out these steps:
1 Score Remaining Resources 2a2y5u
- For every 5 coins and/or Daimyo Seals you have, 1 Clan Point is granted (rounded down).
- For each Resource that you have between 3 and 6 units remaining, 1 Clan Point is granted. If you have 7 units of a Resource left, you get 2 Clan Points.
2 Score the age of Time 4f151h
- If your Influence marker has reached the second season, you get 3 Clan Points. If it ends up in the third season, then you get 6 Clan Points. Once you reach the fourth season, you are granted the score indicated on the space that your token occupies (which is between 10 and 15 Clan Points).
Symbols 6n1551
Gain this number of Clan Points.
Gain this amount of Food by moving your marker up (max. 7 — any amount beyond this is ignored).
Gain this amount of Iron by moving your marker up (max. 7 — any amount beyond this is ignored).
Gain your choice of 1 Resource by moving your marker up. If the icon shows a number, you can opt for the same Resources or for different Resources to reach the total number.
Gain the indicated number of coins from the common reserve.
Gain this amount of Mother of-Pearl by moving your marker up (max. 7 — any amount beyond this is ignored).
Pay the indicated number of coins into the common reserve.
Perform the Well action, as if you had placed a die of value 1.
Perform a Personal Domain action , as if you had placed a die of value 6 in one of your 3 die spaces. You cannot trigger the exact same line more than once in a single turn with this action.
Perform any action associated with a black Die tile in the Castle on the main board.
Perform any action associated with a white Die tile in the Castle on the main board.
Perform any action associated with a coral Die tile in the Castle on the main board.
Perform any action associated with a Die tile that is in the Castle on the main board.
Perform a light-background action from any card in the Castle on the main board.
|
|